Rear Body Clip
Removing the body mould lines and blending in the panels.
The rear body clip is made up of various glass fibre panels which have been bonded together
to make the complete rear body assembly. Unfortunately the body clip requires quite a lot of
work done to it, to get a good enough finish before it can be painted. The bonding lines have to
be removed and where the individual panels have been bonded together, various areas
will have to be built up with body filler to get a nice smooth appearance. Lots of work!!
20 Off Photos
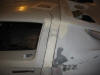
Photo shows RHS of the rear clip before starting to remove the mould lines and blending in the varous panels which make up the rear clip assembly.
Photo shows RHS of the rear clip before starting to remove the mould lines and blending in the varous panels which make up the rear clip assembly.
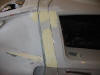
This photo shows the first application of SMC Filler Paste applied on the RHS to blend in two of the panels.
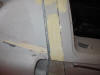
After sanding down with the Random Orbital Sander.
First application of the finer body filler paste.
After the body filler has been rubbed down.
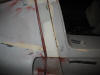
The rubbed down area sprayed with red primer.
Here you can see where I've applied SMC Filler Paste to build up the area between of two panels at the rear of the body clip, left hand side.
Here you can see the filler after the first sanding down operation using the Random Orbital Sander.
I sprayed the rubbed down area with red primer.
After the red primer was dry , I rubbed it down with a fine wet and dry paper.
The fine body filler applied to the highlighted red areas.
After the fine body filler has been rubbed down.
The complete area again sprayed with the red primer, prior to rubbing down again.
Photo shows the LHS of the rear body clip after removing some of the mould lines.
Here you can see where I've applied SMC Filler Paste to build up the area between two panels at the rear of the body clip, left hand side.
This area by the leading edge of the rear body clip, doesn't lend itself to much use of the orbital sander due to all of the curves in this area.
After the SMC has been rubbed down and the finer body filler applied.
After the fine body filler has been rubbed down.
The area after spraying with the red primer, prior to rubbing down again.
There was quite a large step in the panel assembly joint.
This is the first time that I've used this product, so I'll see how it goes before I use it anywhere else on the body.
It's left a few spots which will need filling with a very fine filler.
The low spots showed up as red areas, which gave me the position for the fine body filler to be applied.
Most of the work will have to be done by hand.

Photo shows RHS of the rear clip before starting to remove the mould lines and blending in the varous panels which make up the rear clip assembly.
*******************************************************
The inner body skin at the front of the rear body clip was all twisted so we
came up with this method of correcting the twist and hopefully making it look much better.
Please contact me if you require information/photographs of these panels.
****************************************************
Rear Body Clip
The rear body clip does not align very well with the centre body clip, with the nearside being much worse than the off side.
Having spent many hours trying to adjust both body clips to achieve a decent fit I decided that the only course of action was to build up the panels in the areas where it was needed.
The following photos will show how this was achieved.
Left Hand Side (7 Off Photos)
Near side. First application of 'SMC Fibre Filler' to the 'B Pillar'.
Second application of the 'SMC Fibre Filler'.
Sprayed, prior to rubbing down.

Near side. First application of 'SMC Fibre Filler' to the 'B Pillar'.
*******************************
Right Hand Side (7 Off Photos)
Off side. First application of 'SMC Fibre Filler' to the 'B Pillar'.
Sprayed, prior to rubbing down.

Off side. First application of 'SMC Fibre Filler' to the 'B Pillar'.
*****************
Grill Panels
There are three main grill panels on the rear body clip; two at the back and one on top.
There are also the two air inlet vents on the leading edge of the rear body clip and these are only covered with a mesh panel for the IVA test. After completing the test, these two panels will be removed and replaced by the permanent stainless steel items.
These photos show the three main grill panels.
The two air outlet openings with the temporary mesh panels.
Please contact me if you require information/photographs of these panels.
*************************************************
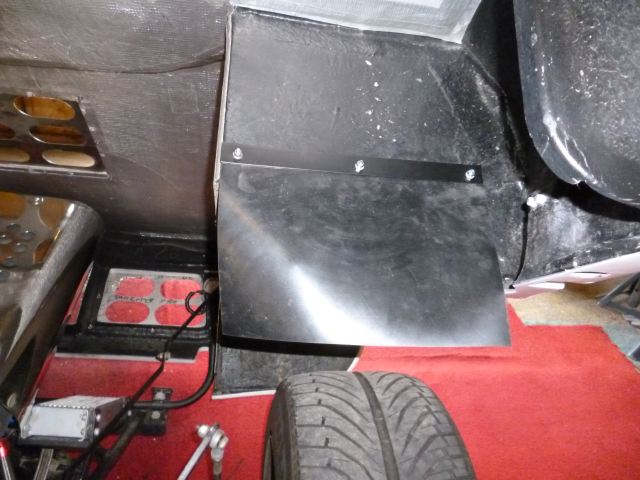
The photo below shows the 'mud flap' which I have fitted to both of the rear wheel arches.
Hopefully this flap will prevent water etc from the wheels being sprayed all over the inner chassis where on the driver's side, the battery sits and where on the passenger's side, the small storage box sits.
****************************************


 .
.